- Home
- /
- llm-for-zotero Documentation
- Edit on GitHub ↗
llm-for-zotero: A Research Agent System for your Zotero Library


📖 中文版使用手册
llm-for-zotero brings Large Language Models into the Zotero reader, so you can ask questions, summarize papers, inspect figures, compare sources, and save notes without leaving your library. It works with standard API providers, local OpenAI-compatible models, WebChat, Codex App Server, and Claude Code.
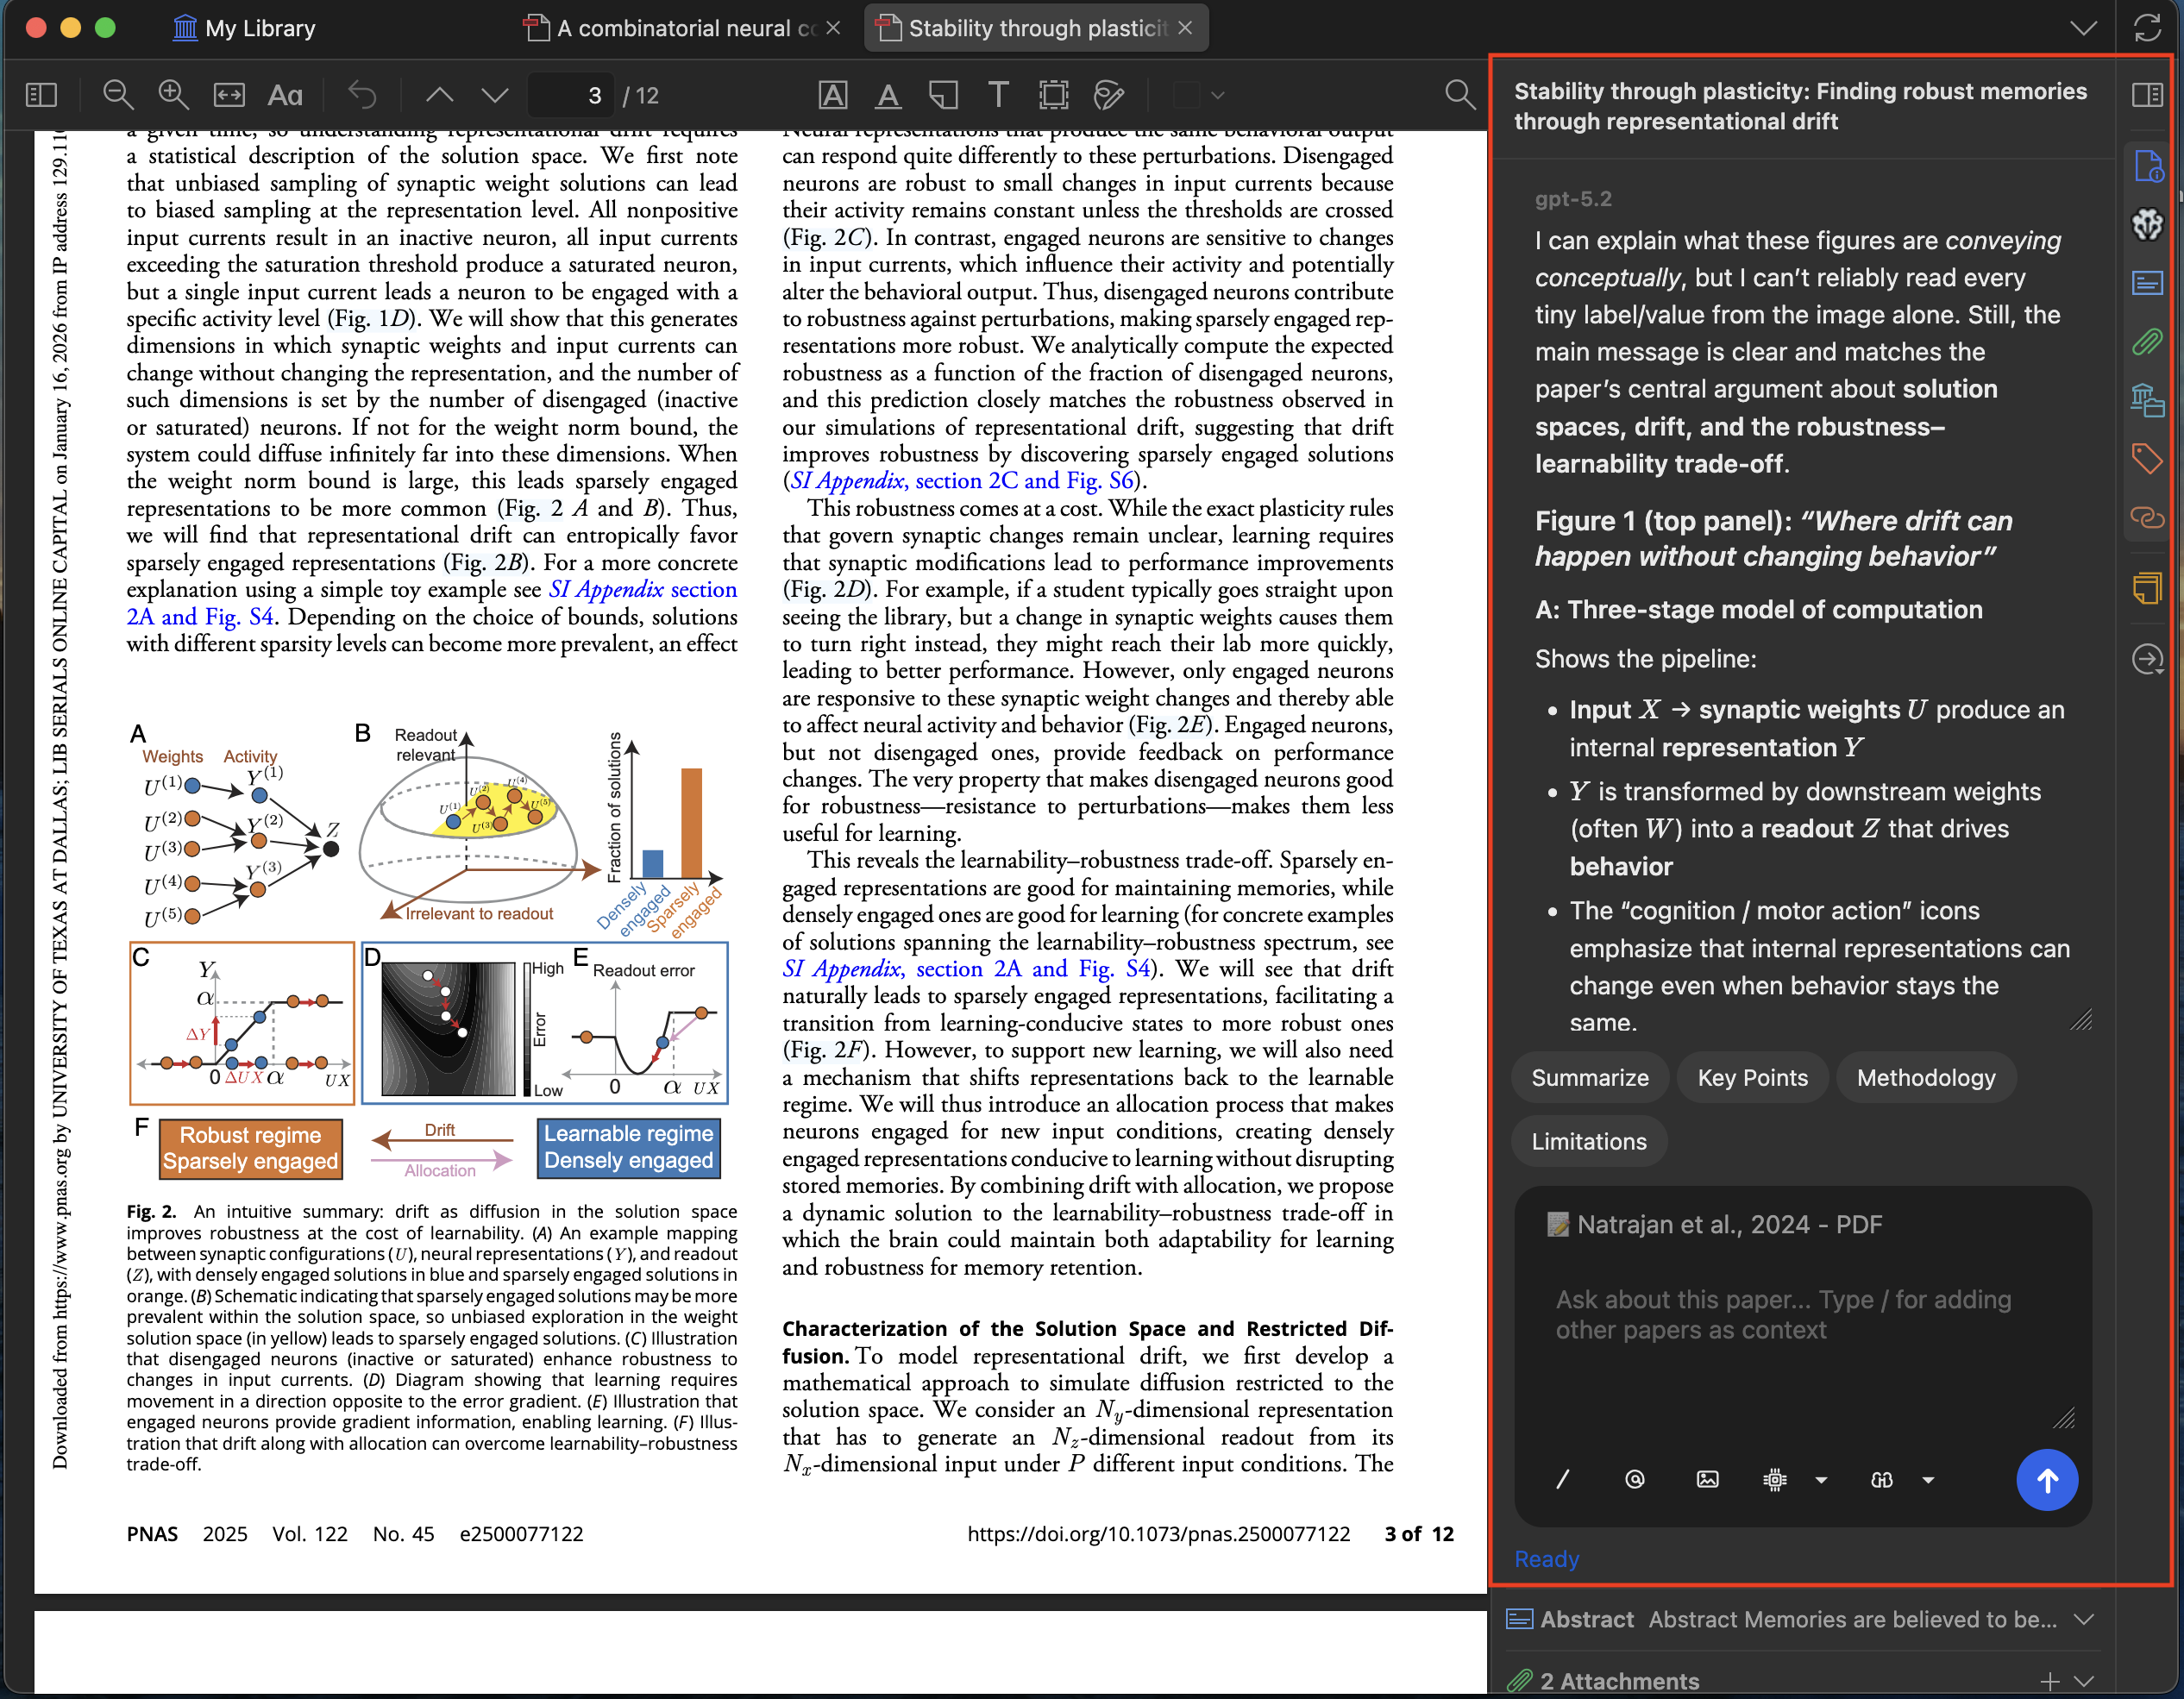
Ask questions about any open PDF and jump from model citations back to the source passage.
Multi-Provider SupportOpenAI, Anthropic, Gemini, DeepSeek, Moonshot, local OpenAI-compatible models, and more.
WebChatUse ChatGPT or DeepSeek through the browser with Sync for Zotero when you do not want a provider API key.
Agent Mode (Beta)An autonomous agent that manages your library, runs terminal commands, and accesses local files — with approval before changes are applied.
MinerU PDF ParsingUse cloud MinerU or a local mineru-api server for high-fidelity parsing that preserves tables, equations, figures, and complex layouts.
Precise Figure ExtractionAsk about a figure and the agent crops it straight from the source PDF — sharp, accurate, and ready to embed in your notes.
Standalone WindowOpen the LLM Assistant in its own dedicated window with a full-sized chat interface and conversation history sidebar.
File-Based NotesSave research notes as Markdown files in Obsidian, Logseq, or any local notes folder with metadata, citations, and extracted figures.
Customizable Skills8 built-in skills guide the agent's workflows for common tasks. Create your own with simple Markdown files.
Codex & Claude CodeUse Codex through the local app-server runtime, or run experimental Claude Code conversations through a local bridge.
Quick Start
- Download the latest
.xpifile from the Releases page. - In Zotero, open
Tools→Add-ons→ gear icon → Install Add-on From File, then select the.xpi. - Restart Zotero.
- Open
Preferences→llm-for-zotero, choose a provider, enter the base URL, key, and model, then click Test Connection. - Open a PDF in Zotero and click the LLM Assistant icon in the right-hand toolbar.
If you do not want to use a provider API key, start with WebChat or Codex App Server.
Requirements
- Zotero
- A model backend: provider API key, local OpenAI-compatible model, WebChat, Codex App Server, or Claude Code.
- A Chromium-based browser for WebChat mode.
- Node.js 18+ for npm-based Codex CLI installation and the Claude Code bridge. The macOS Codex cask does not require a separate Node.js install.
- A personal MinerU API key or a local
mineru-apiserver is recommended if you enable MinerU parsing.
Choose Your Setup
| Goal | Recommended path | API key required? |
|---|---|---|
| Use OpenAI, Gemini, DeepSeek, Moonshot, or another provider | Configure an API provider in Zotero preferences | Yes |
| Use a local model | Connect any OpenAI-compatible local HTTP API | Usually no |
| Use ChatGPT or DeepSeek in the browser | WebChat with the Sync for Zotero extension | No |
| Use Codex models with ChatGPT Plus | Codex App Server | No separate API key |
| Use Claude Code inside Zotero | Claude Code bridge | Claude Code auth |
| Improve PDF extraction for tables, equations, and figures | MinerU PDF parsing | Personal MinerU key recommended |
What’s New
- Codex App Server is the recommended Codex path for ChatGPT Plus users. It runs through the local
codex app-serverruntime and is configured from the Agent tab. - Claude Code Mode (experimental): Run Claude Code as a separate conversation system inside Zotero through the companion local bridge. This mode is still under development and does not yet support native Zotero API operations; native Zotero tool support is planned. See Claude Code Setup.
- WebChat Mode supports ChatGPT and DeepSeek web sync through the Sync for Zotero browser extension.
- File-Based Notes: Notes are no longer hard-coded to Obsidian. Configure any local Markdown directory, including Obsidian, Logseq, or a plain folder. See File-Based Notes.
- Skills: Customizable guidance files shape how the agent handles different tasks. 8 built-in skills are included, plus a portal for creating your own. See Skills.
- Standalone Window Mode opens the assistant in a dedicated window with paper chat, library chat, and conversation history.
- Cache-aware Agent Mode preserves stable paper context, prior read evidence, and coverage state across longer research turns, then compacts old transcript history automatically when the context window gets crowded.
- Citation navigation keeps citation labels conservative until page locations are verified, while quote-based citations can jump back to the matching Zotero passage.
- MinerU PDF parsing: High-fidelity extraction preserves tables, equations, and figures more accurately, with support for cloud MinerU, local
mineru-apiservers, bulk parsing, cache repair, sync packages, tags, and parsing filters. - Precise Figure Extraction: Figure questions and figure notes now use crops cut directly from the source PDF — with MinerU as the index — instead of MinerU’s own figure images, for sharper, more accurate figures. See Precise Figure Extraction.
Thanks to @jianghao-zhang and @boltma for major contributions to the Codex App Server, Claude Code, and file upload workflows.
Installation
Download the latest
.xpirelease Go to the Releases Page and download the latest.xpifile.Install the add-on in Zotero Open Zotero →
Tools→Add-ons→ click the gear icon → Install Add-on From File → select the.xpifile.Restart Zotero Restart Zotero to complete the installation. The plugin automatically checks for future updates on startup.
Configuration
Open Preferences → navigate to the llm-for-zotero tab.
- Select your Provider (e.g. OpenAI, Gemini, DeepSeek).
- Paste your API Base URL, secret key, and model name.
- Click Test Connection to verify.
Supported Providers & Protocols
Preset providers include OpenAI, Gemini, Anthropic, MiniMax, GLM, DeepSeek, Grok, Qwen, Kimi, and GitHub Copilot. You can also add any customized OpenAI-compatible HTTP endpoint, including Ollama, LM Studio, vLLM, or a remote proxy.
The plugin natively supports these provider protocols:
| Protocol | Description | Main capabilities |
|---|---|---|
responses_api | OpenAI-style Responses APIs | Streaming, tool calls, file uploads, multimodal inputs, reasoning |
openai_chat_compat | OpenAI-compatible chat/completions APIs | Tool calls and multimodal inputs without direct file upload |
anthropic_messages | Anthropic Messages API | Streaming, tool calls, multimodal inputs |
gemini_native | Google Gemini API | Streaming, tool calls, multimodal inputs |
codex_responses | Codex App Server / Codex Auth (Legacy) | Codex conversations for ChatGPT Plus subscribers without a separate API key |
web_sync | WebChat bridge for ChatGPT / DeepSeek | Browser-extension relay without provider API keys |
Supported Models (Examples)
| API URL | Model | Reasoning Levels | Notes |
|---|---|---|---|
https://api.openai.com/v1/responses | gpt-5.4 | default, low, medium, high, xhigh | PDF uploads supported |
https://api.openai.com/v1/responses | gpt-5.4-pro | medium, high, xhigh | PDF uploads supported |
https://api.deepseek.com/v1 | deepseek-chat | default | |
https://api.deepseek.com/anthropic | deepseek-v4-flash | default | |
https://generativelanguage.googleapis.com | gemini-3-pro-preview | low, high | |
https://generativelanguage.googleapis.com | gemini-2.5-flash | medium | |
https://generativelanguage.googleapis.com | gemini-2.5-pro | default, low, high | |
https://api.moonshot.ai/v1 | kimi-k2.5 | default |
You can also set up multiple providers, each with multiple models for different tasks, such as a multimodal model for figures and a text model for summaries. Cross-check answers across models when you want broader coverage.
Advanced: Reasoning Levels & Hyperparameters
You can set different reasoning levels per model in the conversation panel, such as default, low, medium, high, and xhigh, depending on model support. You can also adjust hyperparameters like temperature and max_tokens_output for more creative or more deterministic responses.
Usage Guide
- Open any PDF in the Zotero reader.
- Click the LLM Assistant icon in the right-hand toolbar to open the sidebar.
- Type a question such as “What is the main conclusion of this paper?”
On the first message, the model loads the full paper content as context. Follow-up questions use focused retrieval from the same paper, keeping the conversation fast and relevant.
Conversation Modes
The plugin supports multiple conversation contexts:
| Mode | Description |
|---|---|
| Paper conversation | Chat about a specific open PDF. Context is drawn from that paper. |
| Global conversation | Library-wide chat, not tied to any specific paper. |
| Note conversation | Chat while editing a Zotero note, with note content as context. |
Interface Controls
- Model selector — switch between configured models mid-conversation.
- Reasoning selector — choose the reasoning level for the current request.
- Font scaling — adjust sidebar font size from 80% to 180%.
- Auto-scroll — automatically scrolls to the latest message.
- Token usage — real-time display of input, output, and reasoning tokens consumed.
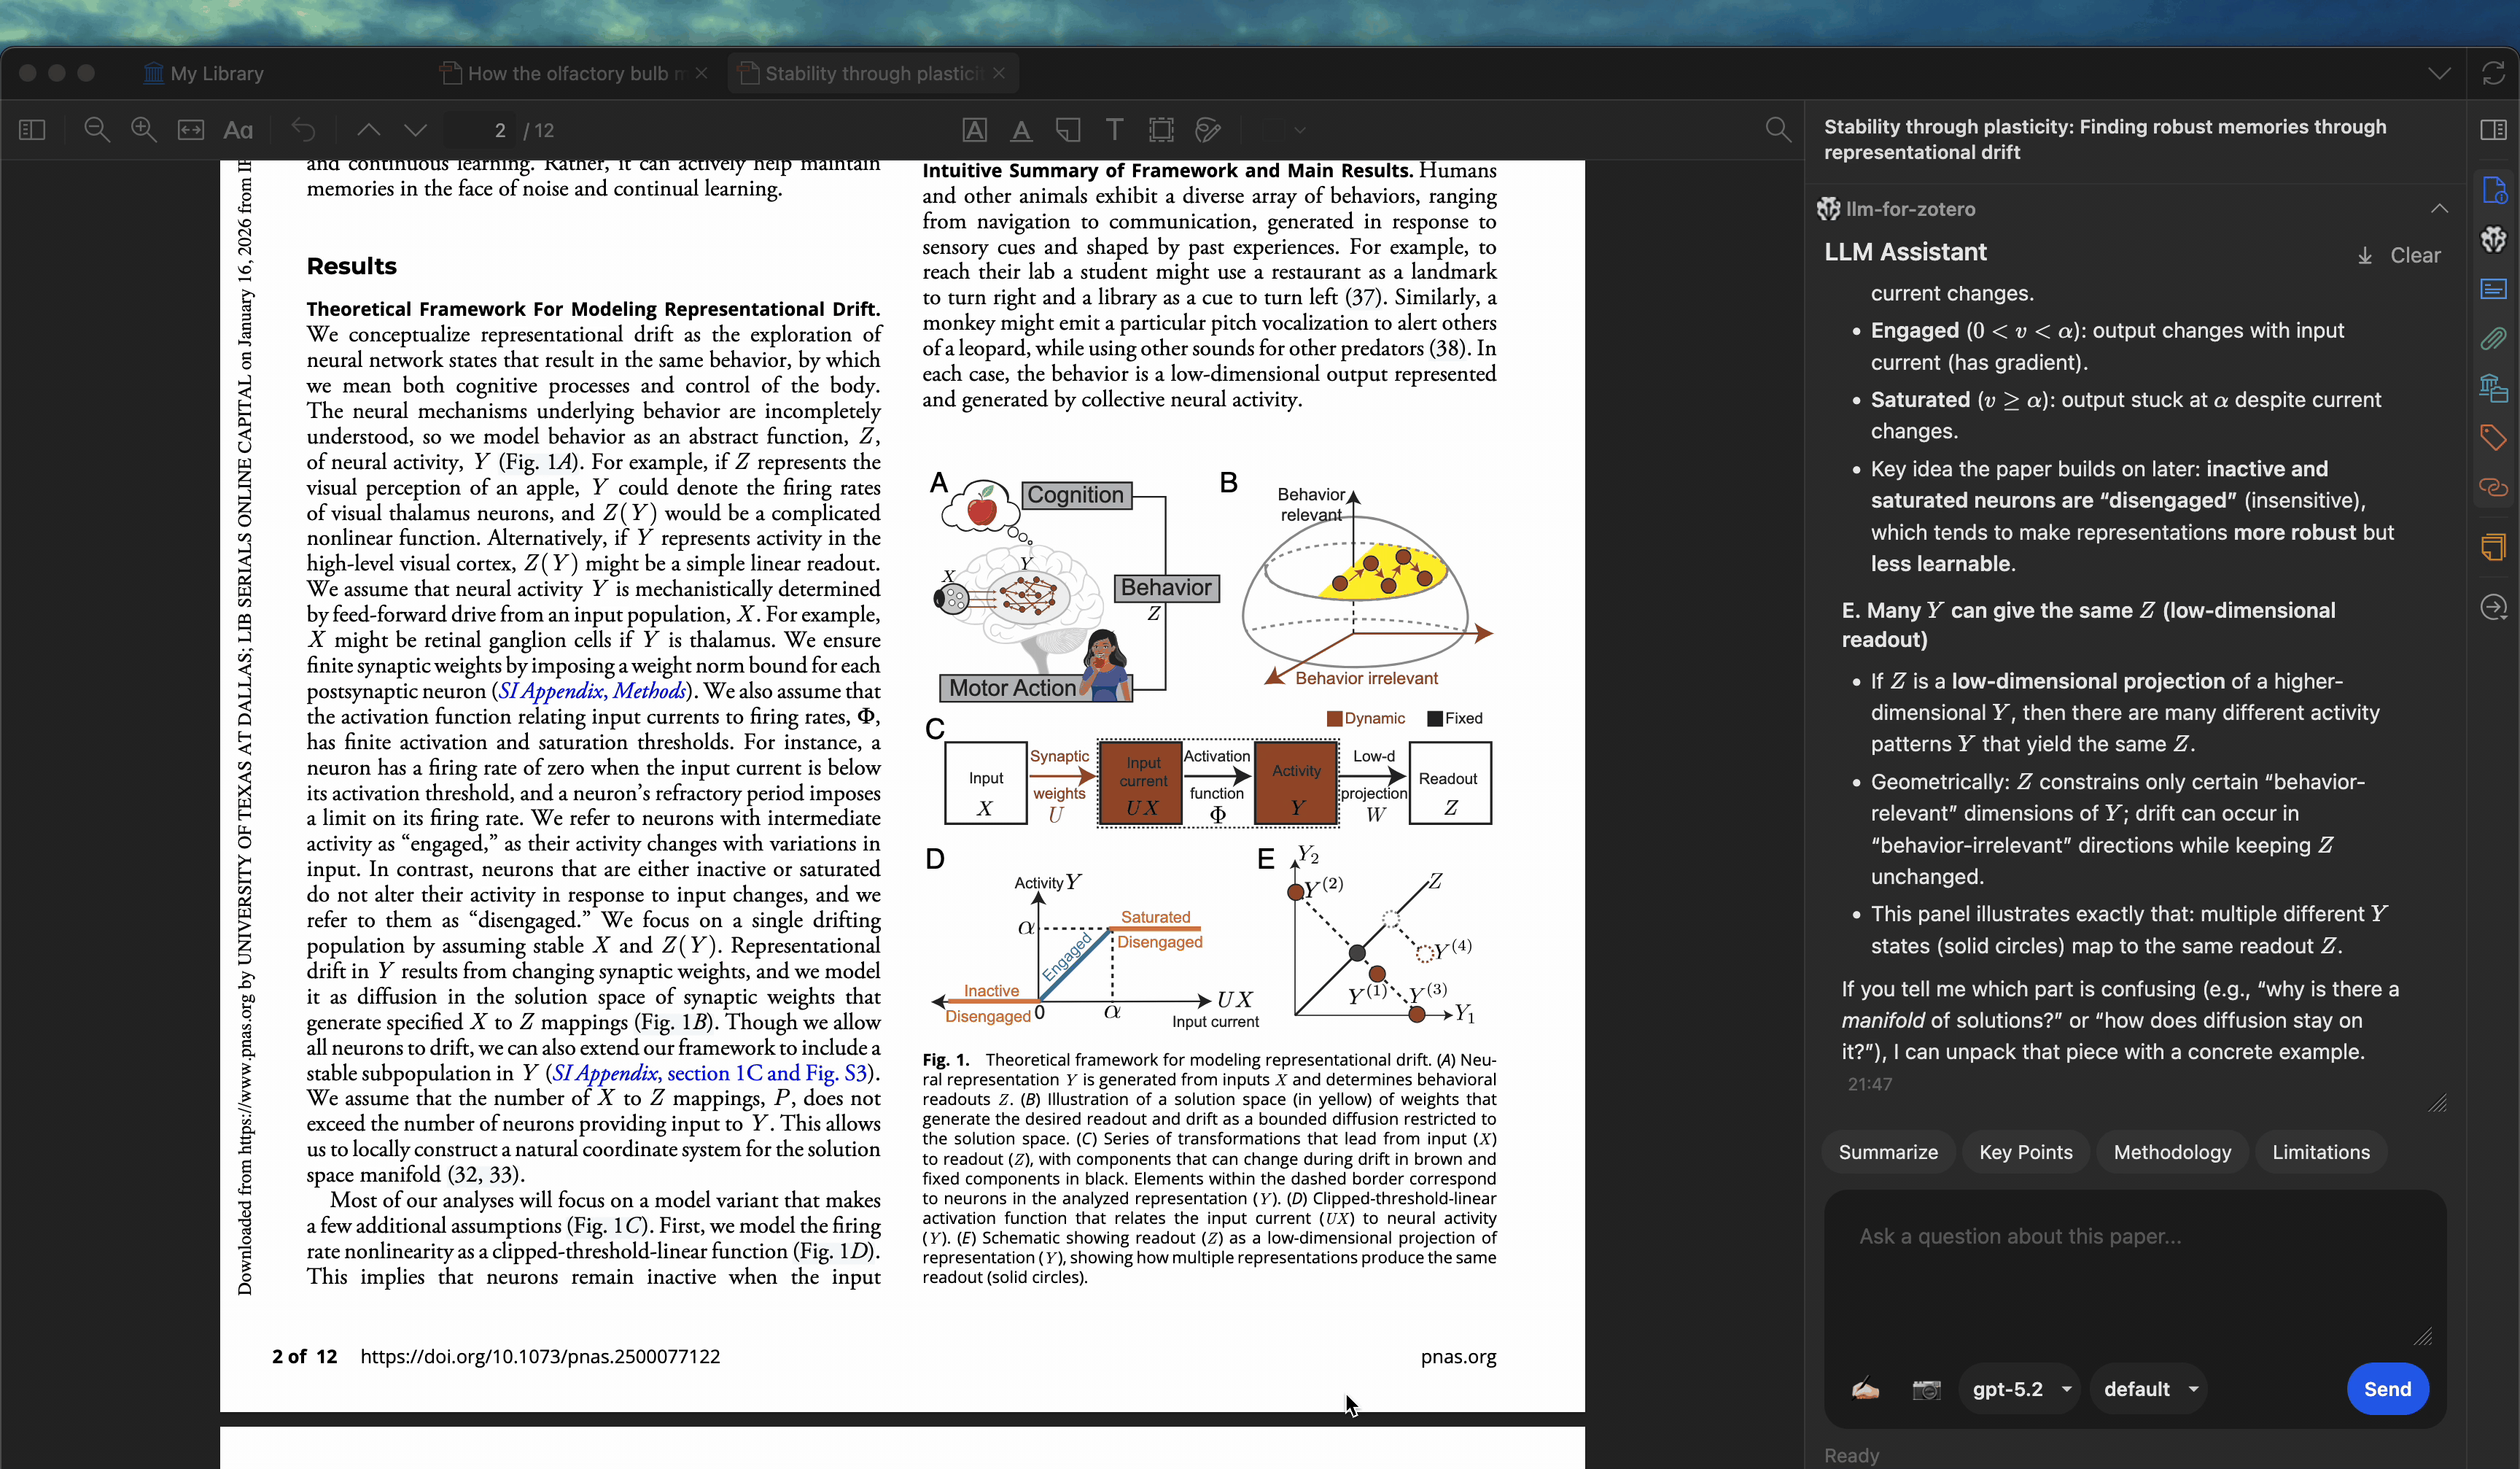
Grounded Answers with Citation Navigation
When you ask a question, the model generates answers grounded in the paper’s content. Citation labels stay conservative until page locations are verified; click a verified citation or quote-based citation to jump back to the matching Zotero passage.
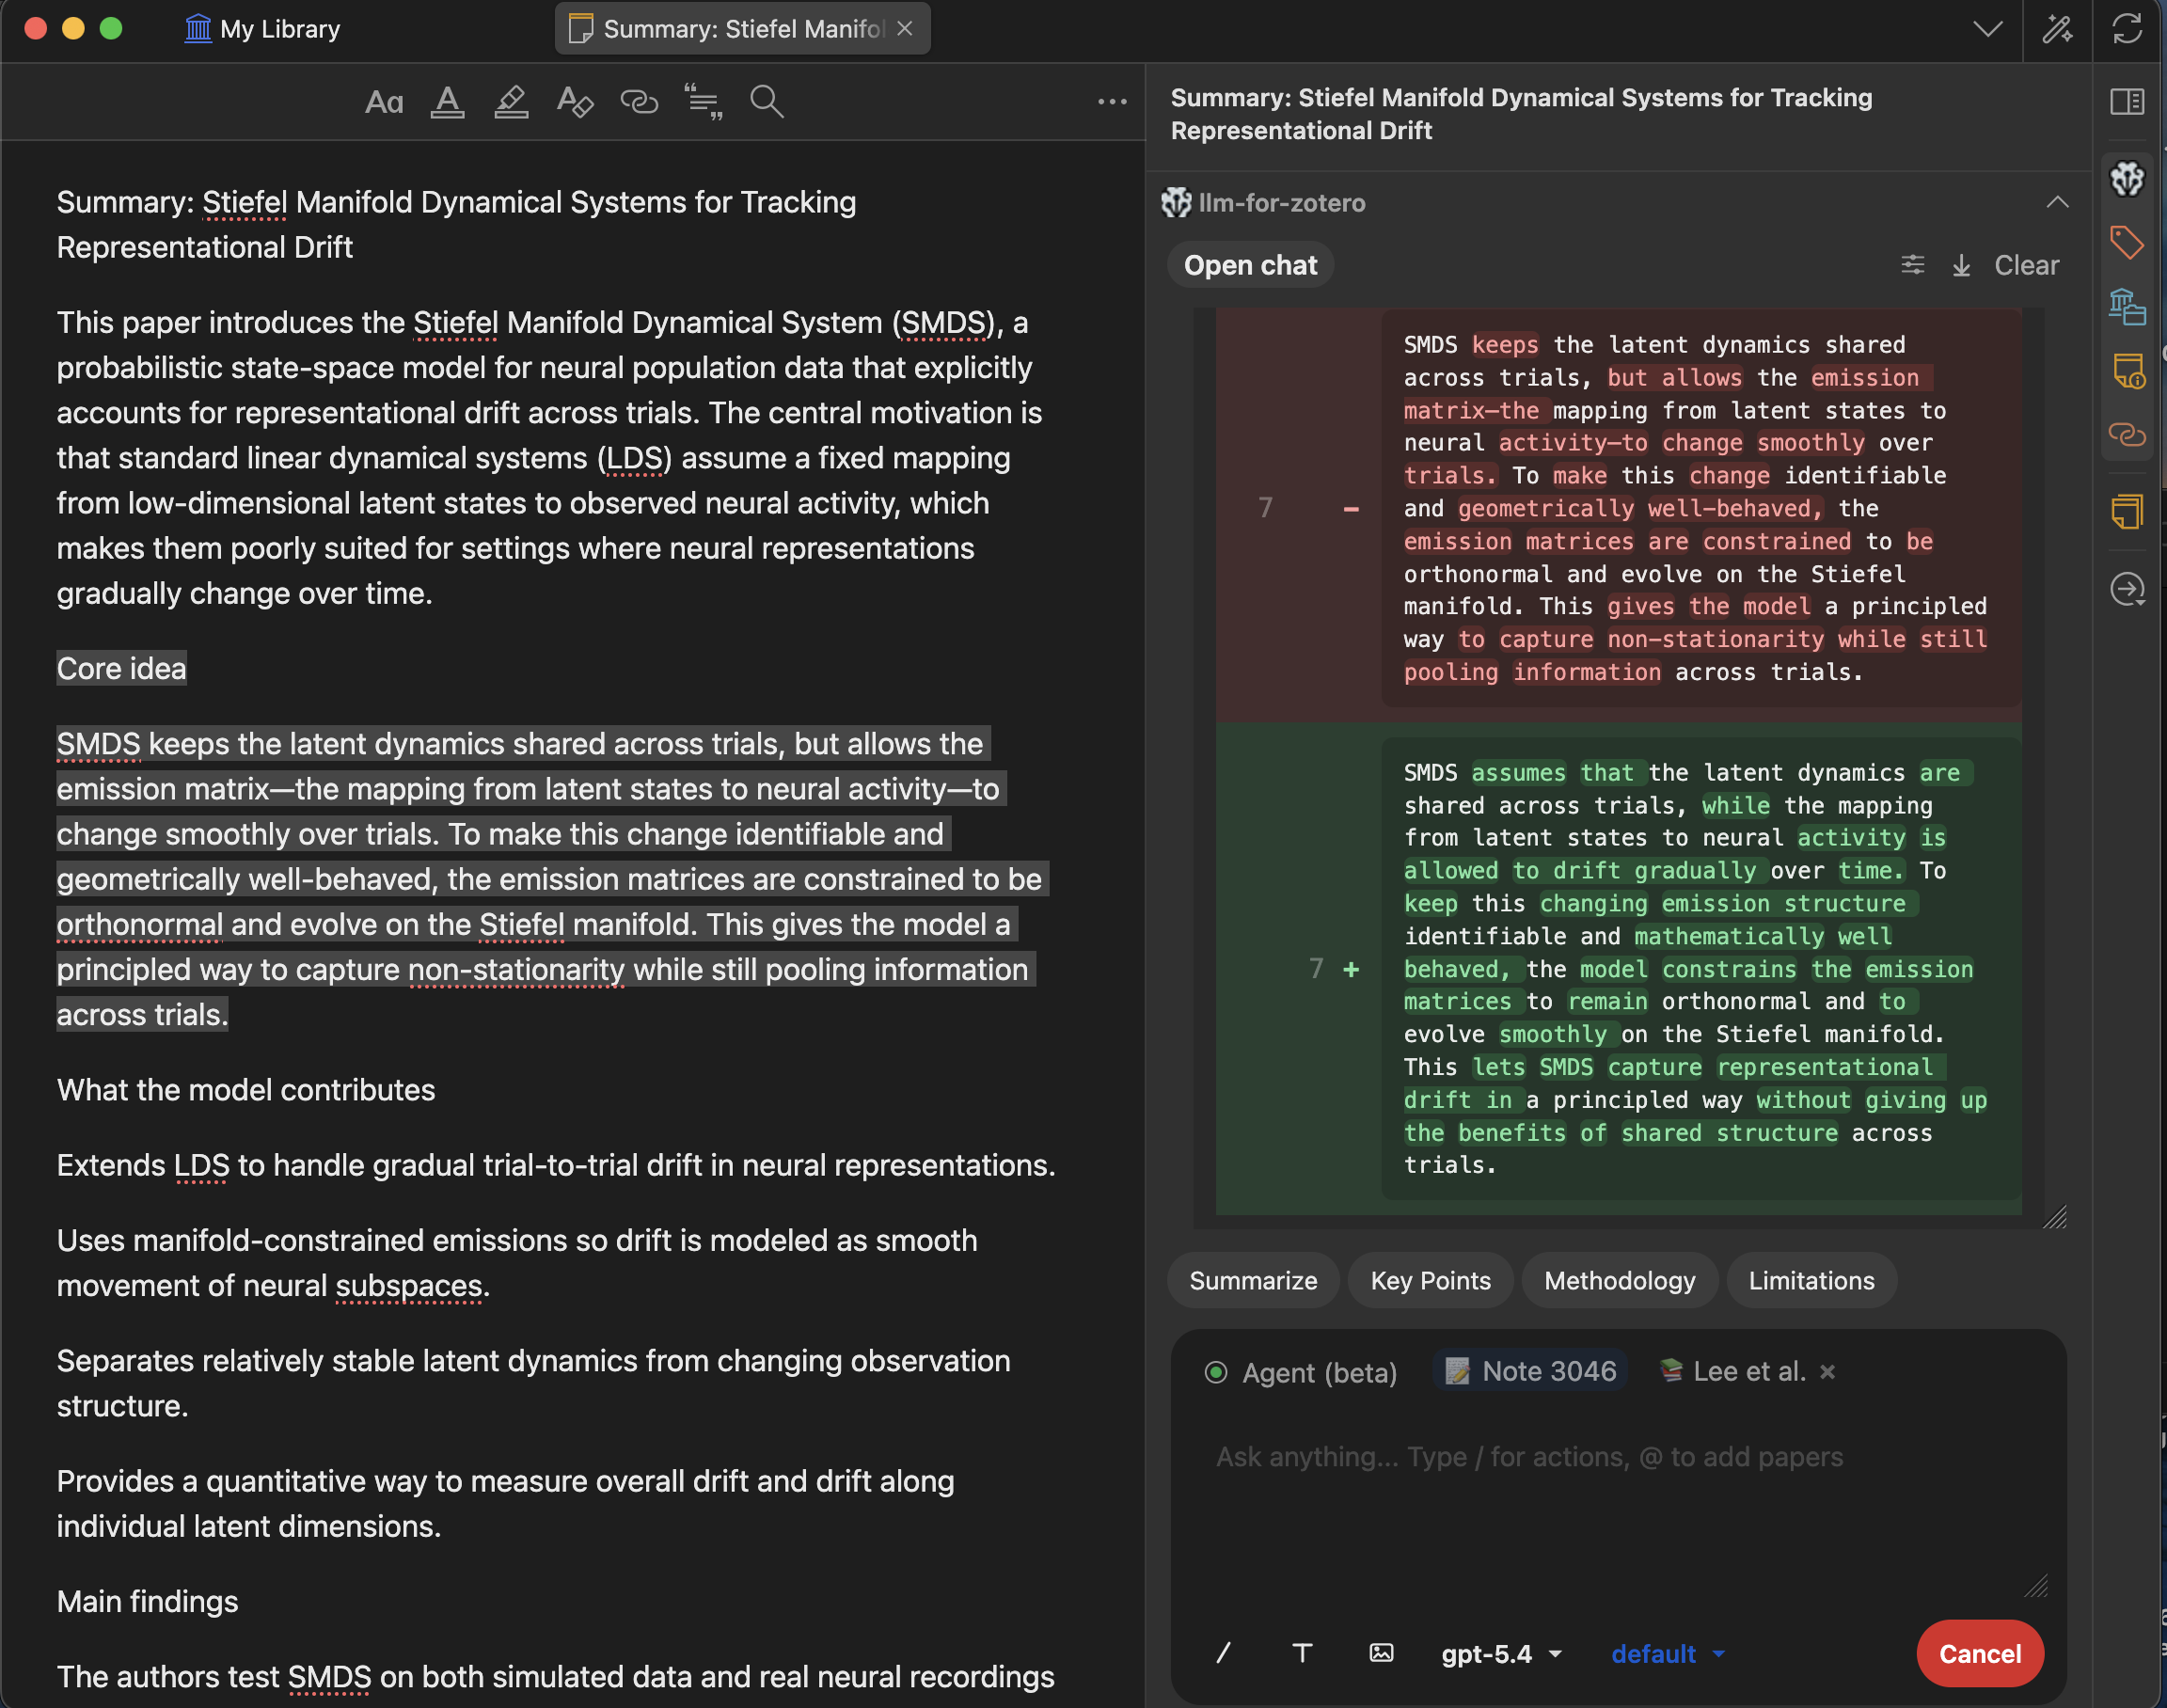
Paper Summarization
Get a concise summary of any paper in seconds. The summary is generated from the full text of the open PDF, and you can customize the prompt to focus on methodology, results, implications, or anything else.
Selected Text Explanation

Select any complex paragraph or technical term in the PDF and ask the model to explain it. You can add up to 5 pieces of context from the paper or previous answers to refine the explanation.
An optional pop-up automatically suggests adding selected text to the chat. This can be disabled in settings if you prefer manual control.
Figure Interpretation
Take a screenshot of any figure, chart, or diagram and ask the model to interpret it. The plugin supports up to 10 screenshots at a time.
Cross-Paper Comparison
Open multiple papers in different tabs and compare them side by side. Type / in the chat input to cite another open paper as additional context. You can reference up to 10 papers in a single conversation, enabling rich cross-paper analysis.
External Document Upload
Upload documents from your local drive as additional context. Supported formats include PDF, DOCX, PPTX, TXT, and Markdown.
Save to Notes
Save any answer or selected text directly to your Zotero notes with one click. This integrates seamlessly with your existing note-taking workflow — no copy-pasting required.
Conversation History & Export
Conversations are automatically saved locally and associated with the paper you’re reading. You can:
- Browse past conversations from the history panel.
- Export entire conversations to Zotero notes in Markdown format.
- Exported notes include selected text, screenshots, and properly rendered LaTeX equations.
Custom Quick-Action Presets
Customize quick-action presets to match your research workflow. Built-in presets include:
- Summarize — generate a concise summary
- Key Points — extract main findings
- Methodology — describe the research methods
- Limitations — identify weaknesses or gaps
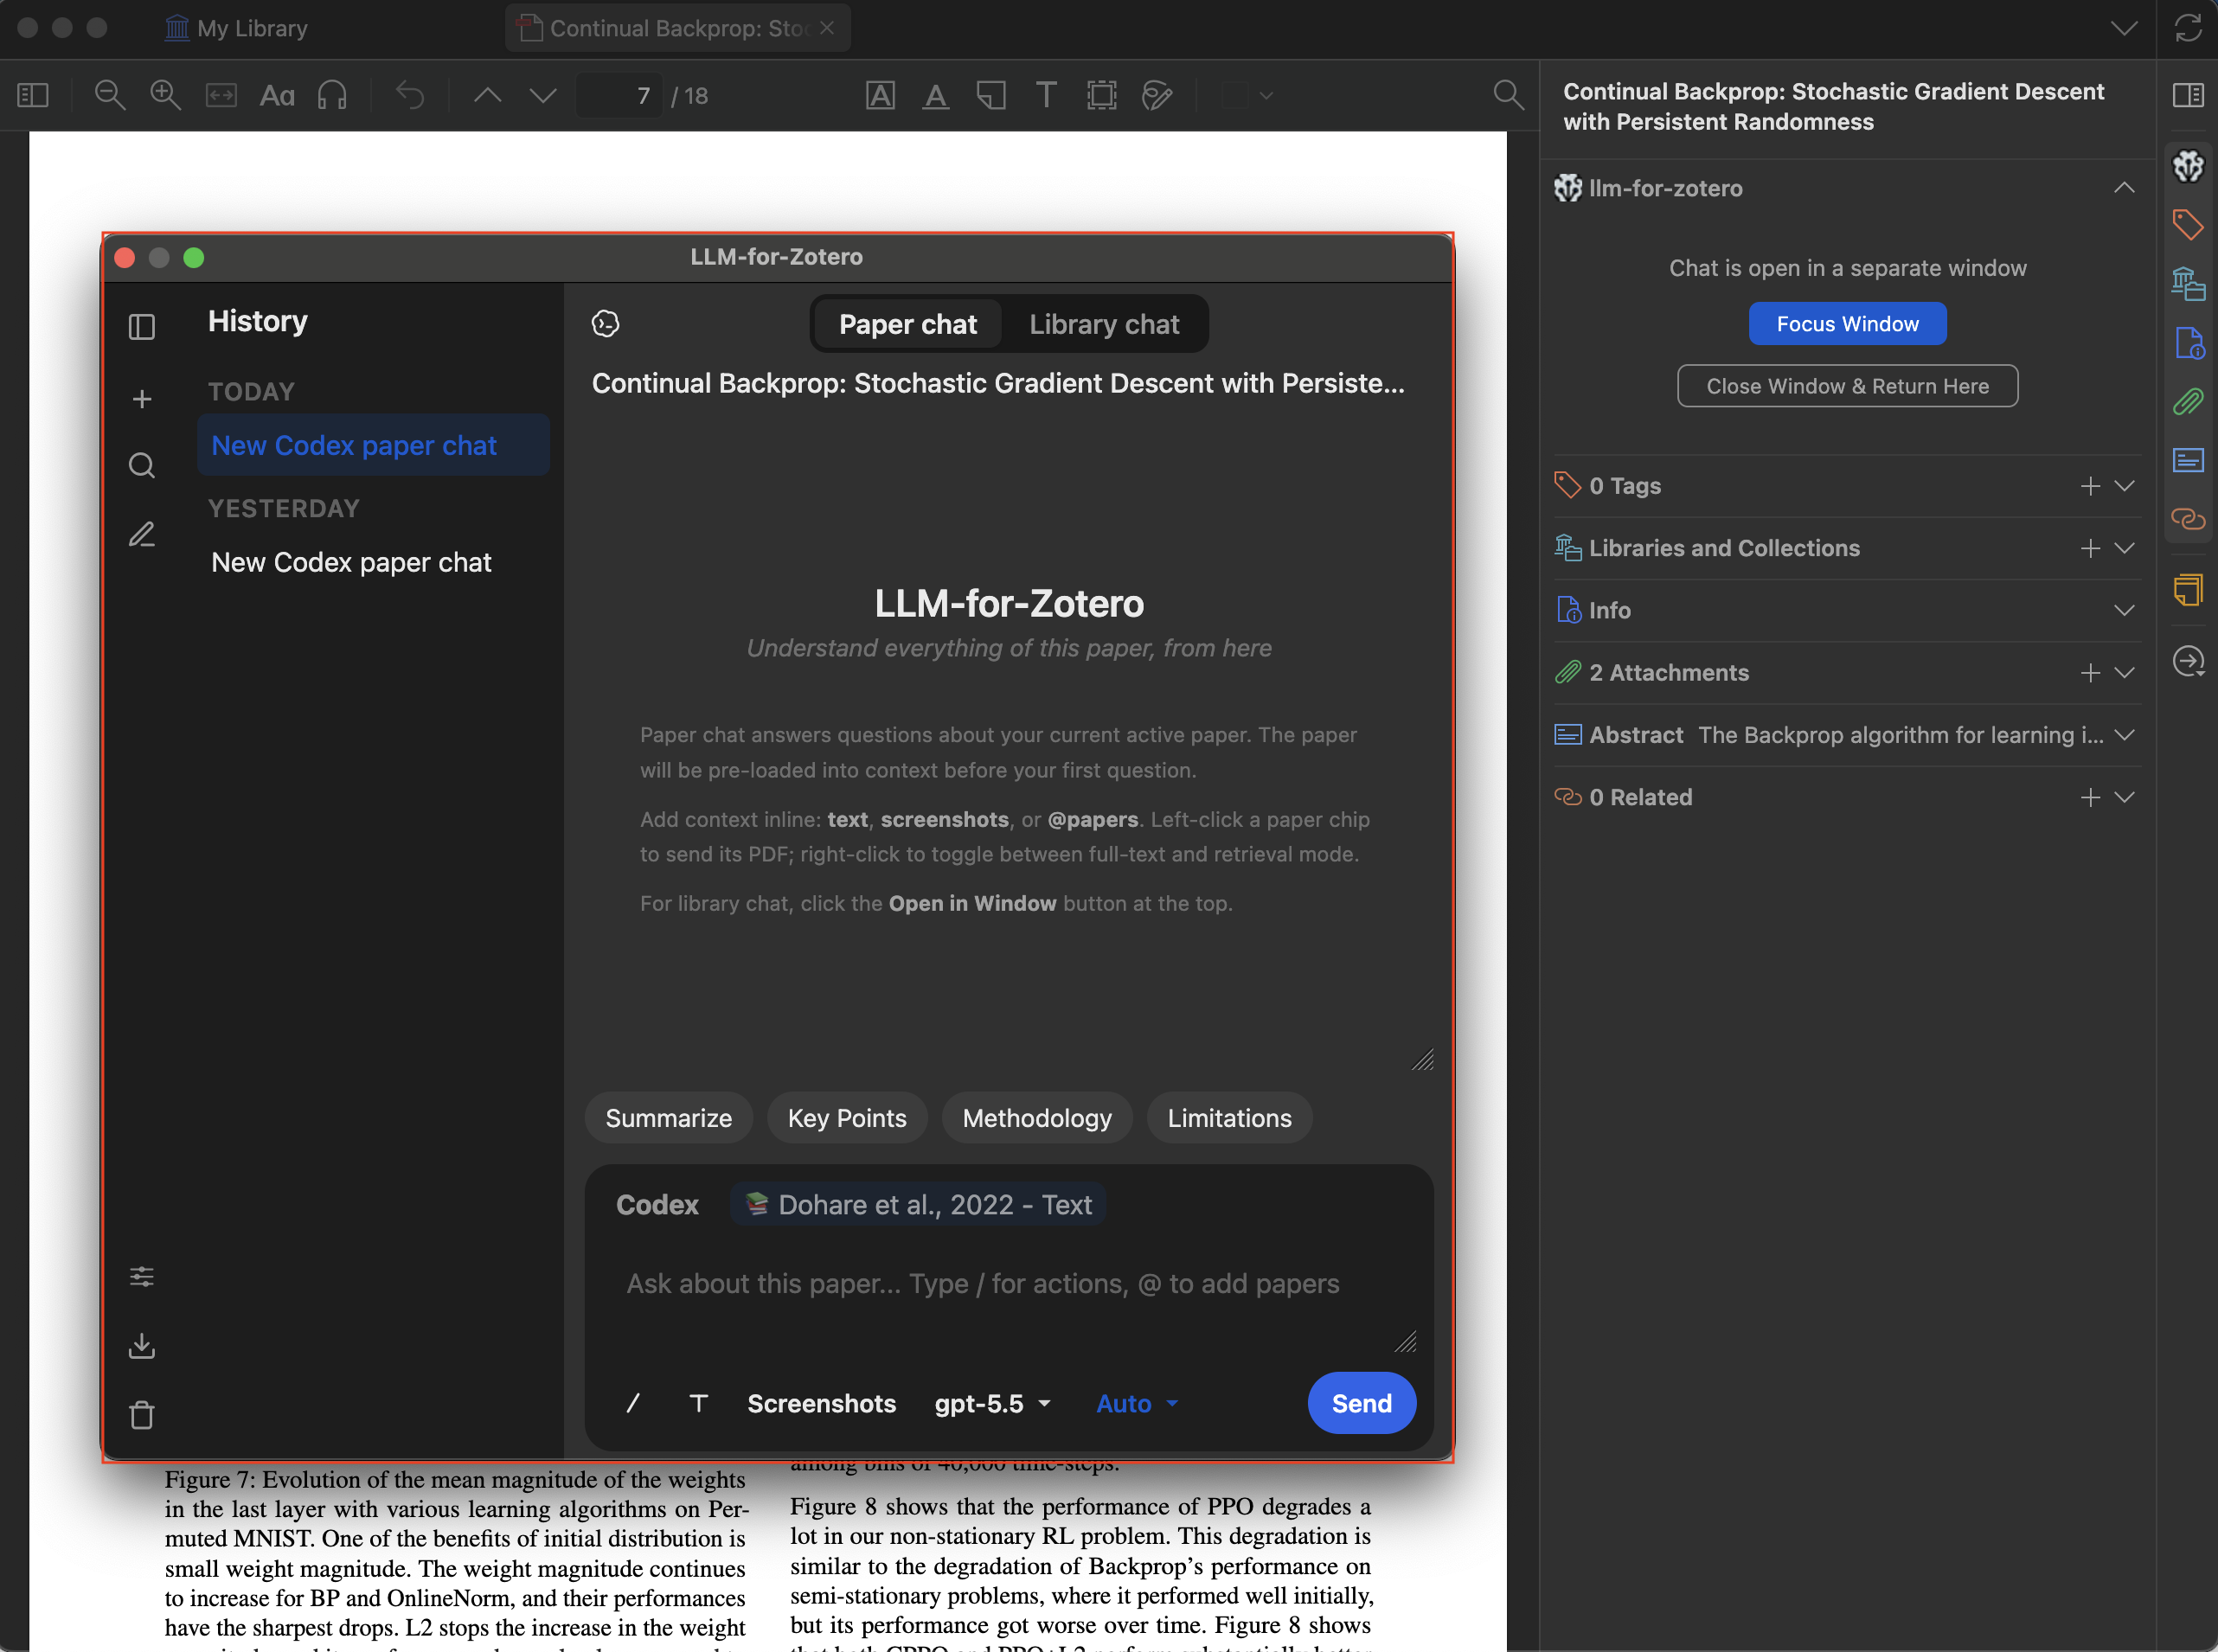
Standalone Window Mode
Open the LLM Assistant in its own dedicated window, separate from the Zotero reader sidebar. The standalone window provides a full-sized chat interface with a collapsible conversation history panel on the left.
How to open
| Method | Action |
|---|---|
| Keyboard shortcut | Ctrl+Shift+L (macOS: Cmd+Shift+L) |
Features
- Paper chat & Library chat — Switch between paper-specific and library-wide conversations using the tabs at the top.
- Conversation history — Browse past conversations organized by date (Today, Yesterday, Last 7/30 days, Older) in the collapsible left sidebar.
- Full feature parity — Everything available in the reader sidebar — screenshots, file uploads, agent mode, quick-action presets, reference picker — works identically in the standalone window.
- Search — Search through your conversation history using the search overlay.
While the standalone window is open, the reader sidebar panels show a placeholder with options to Focus Window (bring the standalone window to the foreground) or Close Window & Return Here (close standalone and restore the sidebar).
File-Based Notes
Beyond Zotero’s built-in notes, the agent can save research notes as Markdown files in any local directory you choose. The plugin is not tied to any specific note-taking app: point it at an Obsidian vault, a Logseq graph, or a plain folder of .md files.
Configuration
Open Preferences → llm-for-zotero and scroll to the Notes Directory section.

| Setting | Description | Example |
|---|---|---|
| Nickname | How you refer to this directory in chat; the agent recognizes the name when you mention it | Obsidian, Logseq |
| Notes Directory Path | Absolute path to the root directory where notes are saved | /Users/me/MyVault |
| Default Folder | Default subfolder for new notes; the agent can write elsewhere if you ask it to | Logs |
| Attachments Folder | Folder for copied figures and images, relative to the directory root | Logs/imgs |
Click Test Write Access to verify the plugin can write to your directory.
How it works
Ask the agent to write a note using the nickname you configured, for example “Summarize this paper and save it to Obsidian” or “Log this to my Logseq”. The agent will:
- Gather content from the paper, including metadata, summary, key points, and figures when available.
- Compose a Markdown note following the
write-noteskill. - Add YAML frontmatter matching the
write-notetemplate:title,created,tags,citekey,doi, andjournal; author information stays in the note body. - Embed extracted figure crops — precise crops cut from the source PDF — and copy them into the attachments folder when requested. See Precise Figure Extraction.
- Write the note to
{notes_directory}/{default_folder}/{title}.md.
If you want to keep notes inside Zotero, the agent can also write to internal item notes with the write-note skill. Ask it to “save a note for this paper” without mentioning an external directory.
Zotero Notes vs. File-Based Notes

Notes use Pandoc citation syntax ([@citekey]), compatible with Obsidian’s Zotero Integration and Pandoc plugins, as well as most Markdown readers.
write-note skill. Open the Standalone Window, then the Skills portal, to customize them.Agent Mode (Beta)
When enabled, the LLM becomes an autonomous agent that can read, search, and write within your Zotero library. Read tools run directly; write tools route through confirmation cards and stay undoable.
Long agent runs are cache-aware. The plugin keeps stable Zotero context and previously read evidence separate from the changing chat transcript, tracks which papers and passages have already been inspected, and automatically compacts old turns when the model context fills up. Follow-up questions can reuse grounded evidence when it is still relevant, while the agent reads again when the needed source or coverage layer is missing.
Library & PDF Reading Tools
These tools let the agent explore your library, PDFs, attachments, and scholarly sources without modifying anything.
| Tool | Description |
|---|---|
query_library | Discover Zotero items and collections: search or list any item type, filter by author, year, collection, item type, or tag, browse the collection tree, find related papers, and detect duplicates |
read_library | Read structured item state for one or more items: metadata, notes, annotations, attachments, and collection membership |
read_paper | Read text content from a PDF, either opening sections by default or specific section indexes, with up to 20 papers per call |
search_paper | Find evidence in papers via a question and return ranked relevant passages, with up to 10 papers per call |
view_pdf_pages | Render PDF pages as images for visual analysis, by question, by page number, or by capturing the currently visible page |
read_attachment | Read any Zotero attachment by ID, including HTML snapshots, text files, and images, or send the whole file to the model |
search_literature_online | Search live scholarly sources such as CrossRef and Semantic Scholar for metadata, recommendations, references, and citations |
Library Write Tools
All write tools require human confirmation before changes take effect.
| Tool | Description |
|---|---|
apply_tags | Add or remove tags on one or more papers |
update_metadata | Update metadata fields such as title, authors, DOI, journal, or abstract |
move_to_collection | Add or remove papers from collections |
manage_collections | Create or delete collections |
manage_attachments | Delete, rename, or re-link broken attachment file paths |
merge_items | Merge duplicates: keep the master item, move children from the others, and trash the rest |
trash_items | Move items to the trash |
import_identifiers | Import papers by DOI, ISBN, arXiv ID, or URL |
import_local_files | Import local files into Zotero; Zotero auto-fetches metadata for recognized PDFs |
edit_current_note | Edit the active Zotero note or create a new one using plain text, Markdown, or HTML |
undo_last_action | Undo the most recent approved write action in this conversation |
Filesystem & Scripting Tools
The agent includes system-level tools for local files, scripts, and Zotero runtime automation.
| Tool | Description |
|---|---|
file_io | Read or write files on the local filesystem, including text and image files, with offset and length support for partial reads |
run_command | Run a shell command on your local machine (zsh on macOS, bash on Linux, cmd.exe on Windows) for analysis scripts and CLI tools |
zotero_script | Execute JavaScript inside Zotero’s runtime; use read mode for bulk data and write mode for custom mutations |
Example use cases:
- Run a Python or R script to analyze data extracted from your library.
- Export metadata as CSV/JSON for external processing.
- Invoke CLI tools (e.g.
pandoc,ffmpeg,pdftotext) as part of an agent workflow. - Write and execute scripts dynamically to transform or visualize your research data.
- Read local data files and incorporate results back into Zotero notes.
Built-in Actions
The agent provides high-level actions for common library workflows. These chain multiple tools together automatically.
| Action | What it does |
|---|---|
| Audit Library | Scan your library or a collection for incomplete metadata, missing PDFs, missing tags, and other gaps; optionally save the report as a Zotero note |
| Auto-Tag | Suggest tags for the current paper, selected papers, selected collections, or the whole library, then open an editable batch tag-review dialog |
| Complete Metadata | Audit targeted papers for missing bibliographic fields, fetch canonical metadata, and open one review card for the proposed updates |
| Discover Related | Find related papers from recommendations, references, or citations |
| Organize Unfiled | Find unfiled items and organize them into collections via an interactive review workflow |
| Literature Review | Launch the guided literature review workflow |
| Library Statistics | Summarize library or collection statistics such as item types, years, authors, journals, collections, tags, annotations, and growth over time |
MCP Server
The plugin runs a built-in Model Context Protocol (MCP) server, allowing external AI agents and tools to interact with your Zotero library programmatically.
- Endpoint:
http://localhost:23119/llm-for-zotero/mcp - Protocol: JSON-RPC 2.0 (MCP v2024-11-05)
- Methods:
initialize,tools/list,tools/call
This means you can connect any MCP-compatible AI agent (e.g. Claude Desktop, Cursor, custom agents) to your Zotero library and use all the tools listed above.
Agent Demos
Multi-step workflow
The agent can chain multiple tools together to accomplish complex tasks, such as finding a paper, reading its metadata, searching for related work, and writing a summary note.
Find related papers
Apply tags automatically
Write a note
Safety & Confirmation
All write operations go through a human-in-the-loop confirmation workflow:
- The agent proposes a batch of changes (e.g. add tags, edit metadata).
- You review the proposed changes in a rich approval form.
- You can approve, reject, or modify before any changes are applied.
- If something goes wrong, use
undo_last_actionto revert. - Terminal commands and file operations also require explicit approval before execution.
Skills
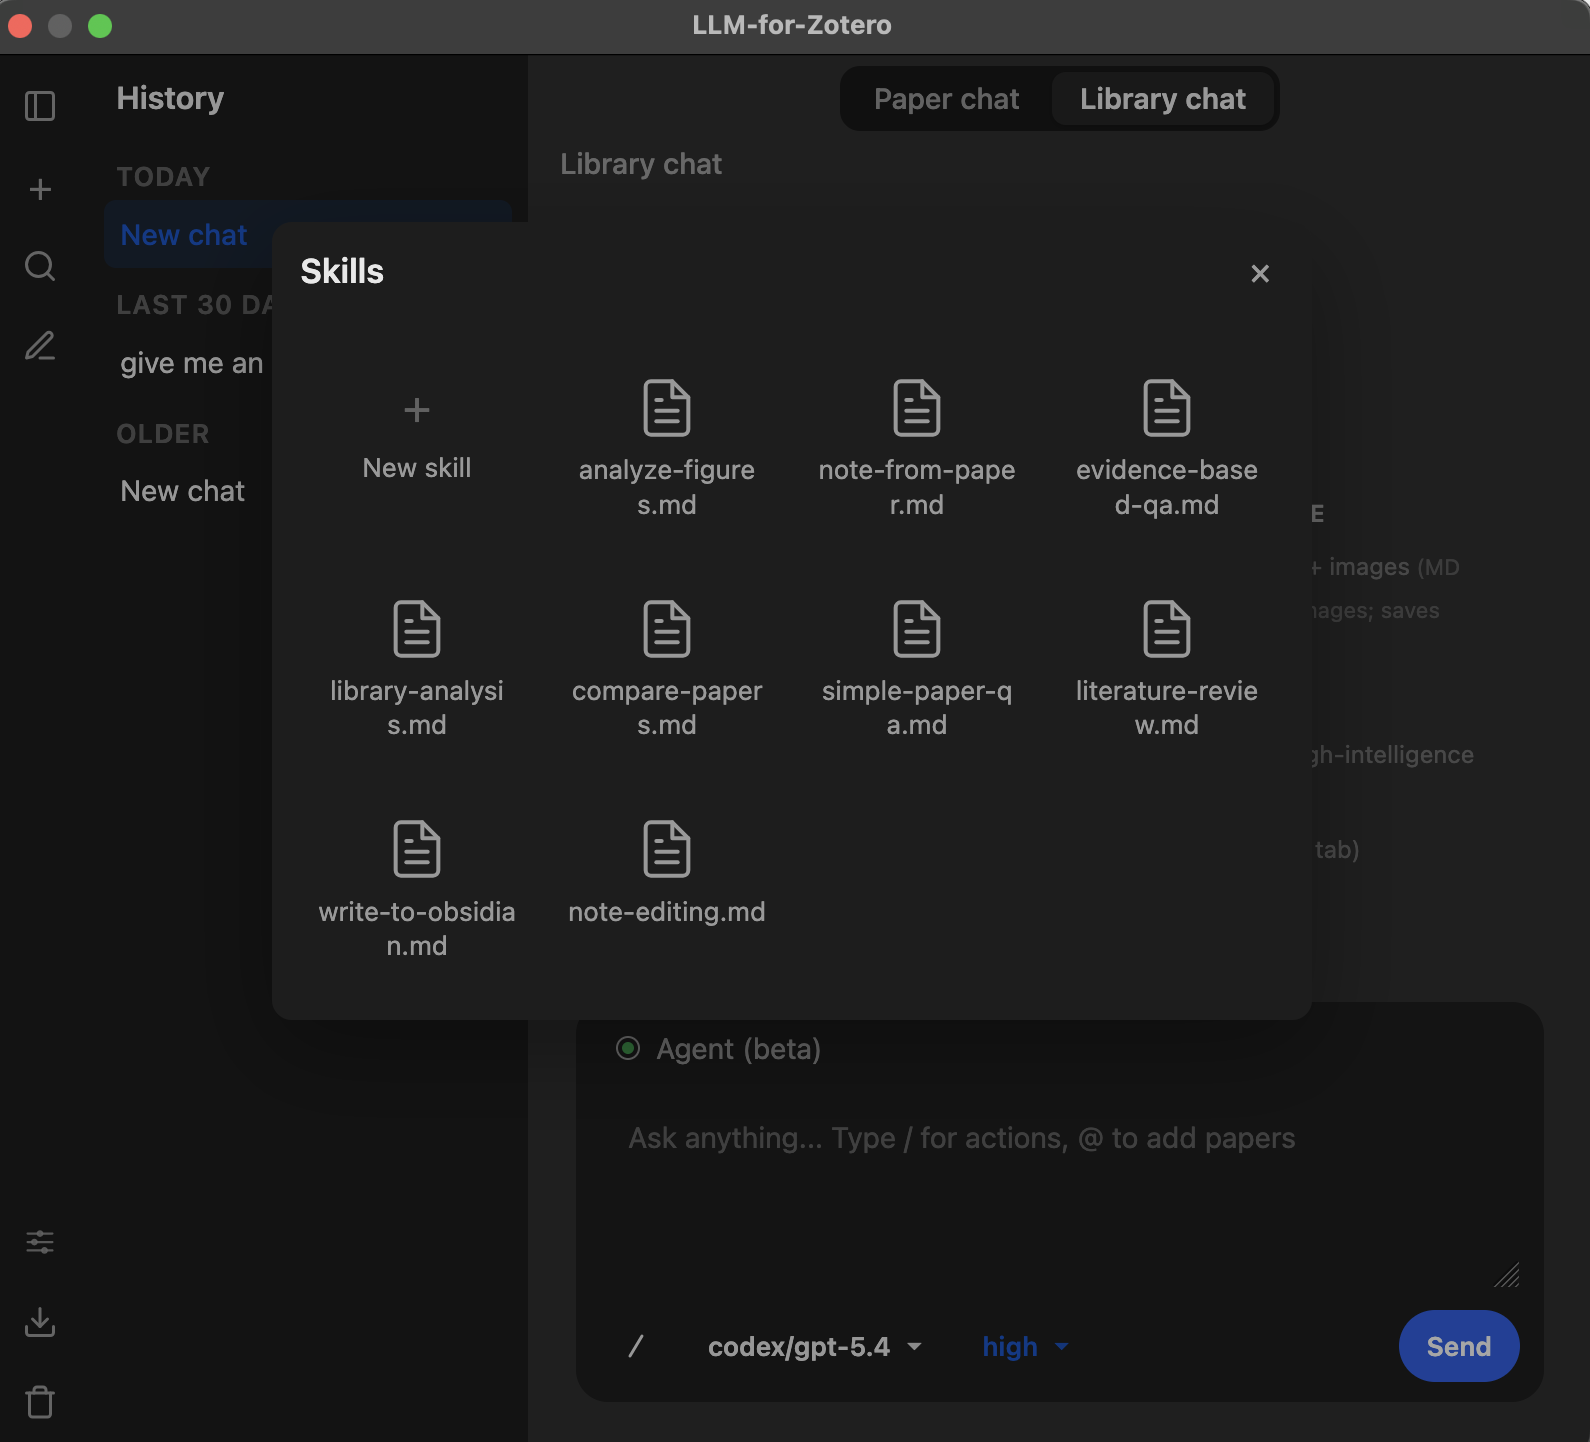
Skills are customizable guidance files that shape how the agent approaches different types of requests. Each skill is a Markdown file with regex trigger patterns: when your message matches a skill’s patterns, its instructions are automatically injected into the agent’s system prompt, guiding it to use the most efficient tools and workflows for the task at hand.
Built-in Skills
The plugin ships with 8 built-in skills covering common research workflows. They are automatically copied to your skills folder on first run.
| Skill | Triggers on | What it guides the agent to do |
|---|---|---|
simple-paper-qa | General questions about a paper, such as summaries, findings, authors, or TLDR requests | Read the paper once and answer immediately, avoiding unnecessary retrieval calls |
evidence-based-qa | Questions about specific methods, results, data, or claims | Read first, then use targeted search_paper retrieval for specific evidence |
analyze-figures | References to figures, tables, or diagrams by number | Extract a precise figure crop from the source PDF (using MinerU as the index) and read it directly; read tables as structured text |
compare-papers | Requests to compare or contrast multiple papers | Batch paper reads and then retrieve focused evidence for comparison points |
library-analysis | Requests to summarize, analyze, or audit your library | Use efficient scripting to iterate library items instead of paginating through context |
literature-review | Requests for a literature review or research synthesis | Discover papers, deep-read the most relevant few, and synthesize thematically |
write-note | Requests to write reading notes as Zotero notes or Markdown files in your notes directory | Compose notes with metadata, Pandoc citations, and optional figure copying |
import-cited-reference | Requests to import papers cited in the current PDF | Extract references and import the selected cited papers into Zotero |
How Skills Work
- When you send a message in Agent Mode, the plugin tests your text against every skill’s
matchpatterns. - If any pattern in a skill matches (OR semantics), that skill’s instruction is injected into the agent’s system prompt for that request.
- Multiple skills can activate simultaneously if your message matches more than one.
- The agent uses these instructions as guidance for tool selection and workflow — they teach the agent how to approach a task, not what tasks it can do.
Creating Custom Skills
- Open the Standalone Window (
Ctrl+Shift+L/ macOS:Cmd+Shift+L). - Click the Skills icon in the top toolbar to open the Skills portal.
- Click the ”+ New skill” button to create a template file.
- The template opens in your default text editor. Edit the three key parts:
---
id: my-custom-skill
match: /your regex pattern here/i
match: /another trigger pattern/i
---

Instructions for the agent when this skill matches.
Describe the workflow, which tools to prefer, and any constraints.
- Save the file. The skill is loaded immediately — no restart needed.
Skill file format:
| Field | Required | Description |
|---|---|---|
id | Yes | Unique identifier for the skill |
match | Yes (at least one) | Regex pattern with optional flags (i, g, m, etc.). Repeatable — multiple match lines use OR semantics |
| Instruction body | Yes | Markdown text after the closing ---. Injected into the agent’s system prompt when the skill matches |
Managing Skills
- Left-click a skill in the portal to open it in your default text editor.
- Right-click a skill for a context menu with Show in file system and Delete options.
- Skills are stored in
{ZoteroDataDir}/llm-for-zotero/skills/as.mdfiles. - If you delete a built-in skill, it stays deleted across restarts — the plugin respects your choice. New built-in skills added in plugin updates are seeded automatically without restoring skills you removed.
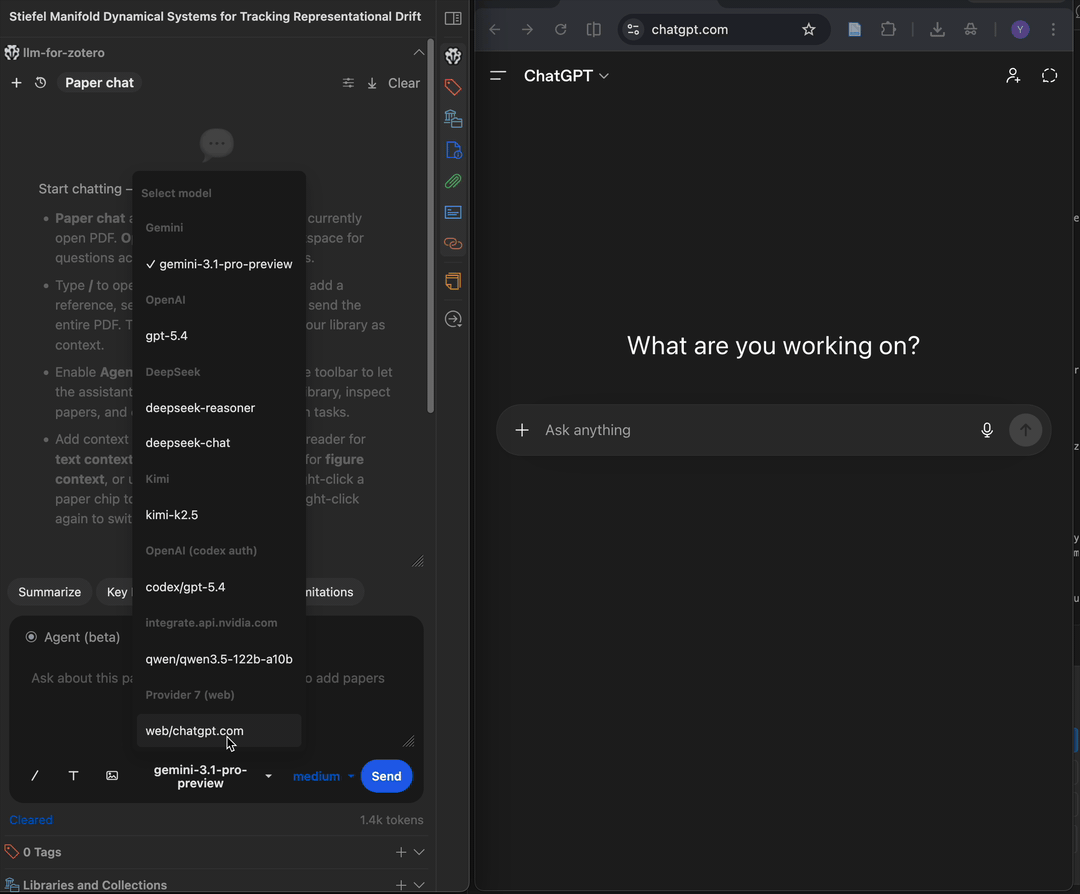
.md files. Drop a skill file into your skills folder and it will be picked up on the next plugin startup or after creating/deleting any skill in the portal.WebChat Setup (ChatGPT & DeepSeek Web Sync)
WebChat mode sends your questions to chatgpt.com and deepseek.com through a browser extension, then streams responses back into Zotero. It is useful when you want ChatGPT or DeepSeek web access without a provider API key.
Prerequisites
- A ChatGPT account for
chatgpt.comWebChat or a DeepSeek account fordeepseek.comWebChat. - A Chromium-based browser such as Chrome, Edge, Brave, or Arc.
Step-by-step setup
1. Download the browser extension:
Go to github.com/yilewang/sync-for-zotero → Releases, download the latest extension.zip, and unzip it to a folder on your computer.
2. Install the extension (sideload):
- Open your browser and navigate to
chrome://extensions - Enable Developer Mode (toggle in the top-right corner)
- Click Load unpacked and select the unzipped extension folder
- The “Sync for Zotero” extension should now appear in your extensions list
3. Configure the plugin:
In Zotero → Preferences → llm-for-zotero:
| Setting | Value |
|---|---|
| Auth Mode | WebChat |
| Model | chatgpt.com or chat.deepseek.com |
4. Start chatting:
Open a ChatGPT or DeepSeek tab in your browser and keep it open. In Zotero, the plugin panel shows a WebChat indicator with a connection dot (green = connected, red = not detected). Type a question and send.
WebChat features
- PDF attachment — Right-click the paper chip to toggle PDF sending (purple = send, grey = skip).
- Screenshots — Use the camera button to attach figure screenshots to your message.
- Conversation history — Click the clock icon to browse and load past web conversations.
- Exit — Click the “Exit” button to return to regular API mode.
Technical Notes
- The plugin embeds a lightweight HTTP relay server on Zotero’s built-in port (23119). The browser extension polls this relay to exchange queries and responses.
- Agent mode, slash commands (
/), and the reference picker (@) are disabled in WebChat mode. - Reasoning/thinking mode is controlled on the web app side, not through the plugin’s reasoning toggle.
Codex Setup (ChatGPT Plus Subscribers)
If you have a ChatGPT Plus subscription, you can use Codex models in the plugin without a separate API key by signing in through the Codex CLI.
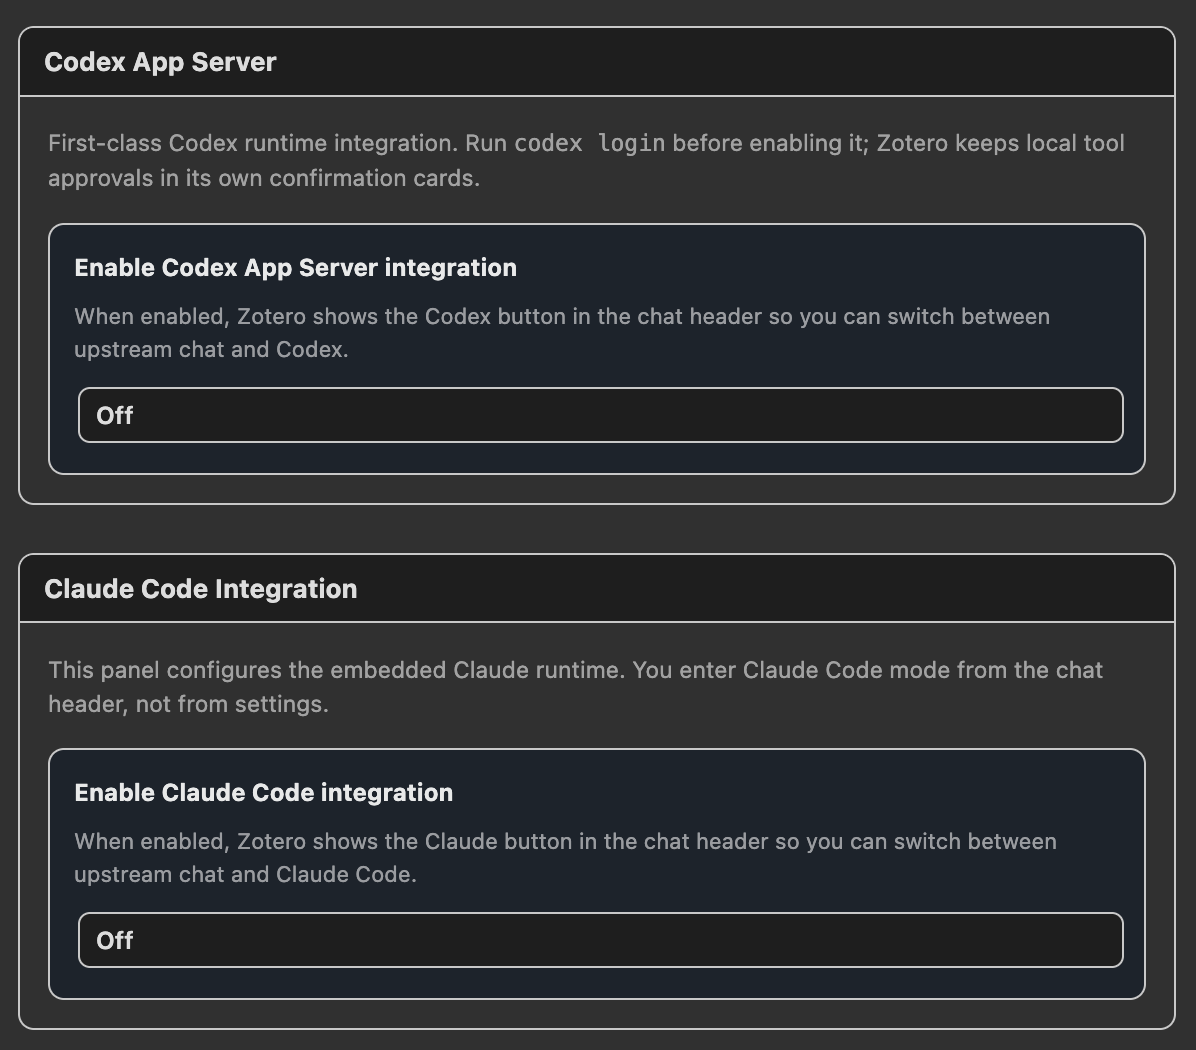
New users should choose Codex App Server from the Agent tab. The older Codex Auth (Legacy) path remains available for existing users, but is planned for future deprecation after app-server validation.
- Codex App Server (Recommended): Spawns the local
codex app-serverCLI and talks to it over stdio. This is the official way to use Codex in third-party apps and the preferred setup for new users. It is configured from the Agent tab and appears as a dedicated Codex button in the chat header. - Codex Auth (Legacy): Uses the ChatGPT/Codex Responses backend directly. Existing users can keep this configuration for now, but new users should choose
Codex App Server.
Special thanks to @jianghao-zhang for contributing the original Codex Auth integration, and to @boltma for designing the Codex App Server integration.
Step-by-step setup
1. Install the Codex CLI (one-time):
# macOS / Linux (requires Node.js 18+)
npm install -g @openai/codex

# macOS alternative (no Node.js needed)
brew install --cask codex
On Windows, install Codex from PowerShell or Command Prompt rather than WSL, so Zotero MCP can use the Windows-local loopback connection.
2. Log in with your ChatGPT account:
codex login
A browser window opens — sign in with your ChatGPT Plus account. Credentials are saved to ~/.codex/auth.json.
3. Enable Codex App Server in Zotero:
Open Zotero → Preferences → llm-for-zotero → Agent tab:
| Setting | Recommended value |
|---|---|
| Enable Codex App Server integration | On |
| Model | e.g. gpt-5.4 |
| Reasoning | auto, low, medium, high, or xhigh |
Click Test connection to verify that Zotero can launch codex app-server, then click the Codex button in the chat header to enter the Codex conversation system.
Codex App Server and Claude Code are mutually exclusive runtime modes in the Agent tab. Disable one before enabling the other.
Existing users who need the old path can open the AI Providers tab, choose Codex Auth (Legacy), keep API URL https://chatgpt.com/backend-api/codex/responses, and use the same Codex model name, for example gpt-5.5.
Codex Auth (Legacy) Technical Notes
- Reads local credentials from
~/.codex/auth.json(or$CODEX_HOME/auth.json). - Automatically attempts token refresh on 401 responses.
- Embeddings are not supported in legacy direct mode yet.
- Local PDF/reference text grounding and screenshot/image inputs are supported.
- The Responses
/filesupload +file_idattachment flow is not supported yet.
Claude Code Setup (Experimental)
Claude Code mode runs Claude Code as a separate conversation system inside Zotero. It reuses the familiar sidebar and standalone-window UI, but keeps its own conversation history, paper / open scope state, model/reasoning settings, permission semantics, slash commands, and project skills.
Prerequisites
- A working Claude Code CLI installation. Follow the official Claude Code installation, quickstart, and authentication docs.
- The
claudecommand must be onPATHand authenticated. Runclaudein a terminal first; if Claude Code is not installed, not onPATH, or not logged in, Zotero’s Claude Code mode will not work. - Node.js and npm for the companion bridge adapter.
1. Install and Verify Claude Code
Install Claude Code using Anthropic’s official instructions, then run:
claude
Complete any login or authentication prompts in Claude Code before continuing.
2. Start the Zotero Claude Bridge
Claude Code mode depends on the companion bridge repo cc-llm4zotero-adapter. The bridge does not replace Claude Code; it connects Zotero to your local Claude Code runtime.
git clone https://github.com/jianghao-zhang/cc-llm4zotero-adapter.git
cd cc-llm4zotero-adapter
npm install
npm run build
npm run serve:bridge
In another terminal, check that the bridge is alive:
curl -fsS http://127.0.0.1:19787/healthz
For macOS users who want the bridge to run in the background, install the LaunchAgent from the adapter repo:
./scripts/install-macos-daemon.sh
Useful bridge daemon commands:
npm run daemon:status
npm run daemon:start
npm run daemon:stop
npm run daemon:restart
npm run daemon:uninstall
If Claude Code mode stops responding, restart the bridge and re-check /healthz. A passing /healthz check only proves that the adapter is running; it does not prove that the underlying claude CLI is installed, authenticated, or correctly configured.
3. Enable Claude Code inside Zotero
Open Zotero → Preferences → llm-for-zotero → Agent tab.
| Setting | Recommended value |
|---|---|
| Enable Claude Code integration | On |
| Bridge URL | http://127.0.0.1:19787 |
| Claude Config Source | default — user + project + local |
| Permission Mode | safe |
| Default Model | sonnet |
| Default Reasoning | auto |
Keep Claude Config Source on default unless you already understand Claude Code settings layers. In default, Claude Code can use your normal user settings plus Zotero-managed project and per-conversation local settings.
After enabling the integration, click the Claude Code button in the chat header to enter Claude Code mode. The Claude conversation system is separate from upstream chat and the built-in agent, so switching modes opens the matching conversation history instead of mixing transcripts.
4. Prepare Claude Project Skills and Commands
Zotero creates a Claude runtime root under your home directory, usually shaped like:
~/Zotero/agent-runtime/profile-.../
Inside that runtime root, shared Claude project assets live in:
CLAUDE.md
.claude/settings.json
.claude/skills/
.claude/commands/
Each Claude conversation also gets its own local .claude folder under the runtime scopes/ tree, so per-conversation overrides do not leak into other chats. You can add shared Claude skills manually under .claude/skills/ or .claude/commands/, but the easiest path is usually to ask Claude Code to create or install the skill in the Zotero project-level Claude config.
Non-Anthropic Claude Code Setups
The Zotero UI exposes opus, sonnet, and haiku as capability tiers. They do not require Anthropic-hosted models specifically. If you route Claude Code through a compatible provider layer or proxy, configure that in Claude Code itself; Zotero only selects the tier and forwards the request to the bridge.
MinerU PDF Parsing
MinerU is an advanced PDF parsing engine that extracts high-fidelity Markdown from PDFs while preserving tables, equations, figures, and complex layouts that standard text extraction often mangles.
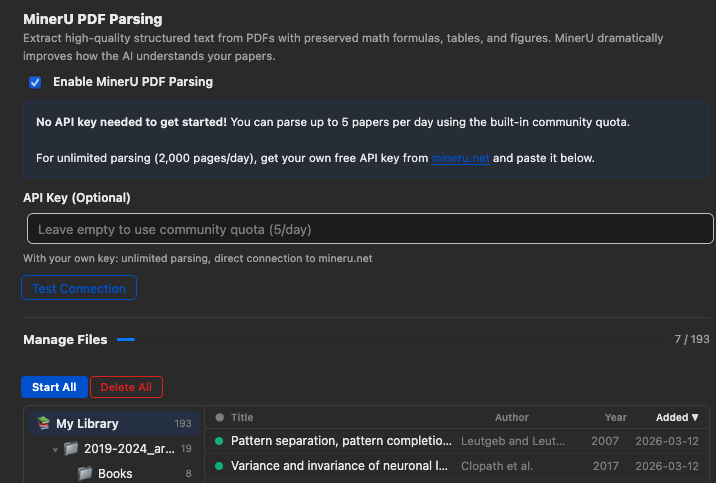
Parsed results are cached locally and reused in later conversations. When Auto-parse newly added items is enabled, newly added PDF attachments are sent to MinerU as they enter the Zotero library. If auto-parse is off, you can still parse selected or filtered PDFs from the Manage Files panel.
The MinerU cache is designed for AI, not as a second human PDF reader. Zotero stays the place where you read, annotate, and manage the original PDF. MinerU creates structured sidecar material that models can use: clean Markdown, section ranges, page hints, tables, equations, and extracted figure assets. This keeps the original Zotero UI mostly untouched while giving the assistant much better paper context than raw PDF text extraction.
For figure questions, MinerU acts as the index that locates each figure, while the image the model actually sees is a precise crop taken from the source PDF; see Precise Figure Extraction.
How to Enable MinerU
- Open Zotero → Preferences → llm-for-zotero.
- Find the MinerU section and check Enable MinerU.
- Keep cloud mode enabled, or check Use local MinerU server for local mode.
- For cloud mode, optionally enter your own MinerU API key.
- For local mode, run a self-hosted
mineru-apiserver and keep the default base URL (http://127.0.0.1:8000) unless your server uses a different address. - To parse new imports automatically, check Auto-parse newly added items. Then add or import a PDF into your Zotero library. The plugin will parse newly added PDF attachments with MinerU and cache the result for future conversations.
Using Your Own API Key
MinerU can start without an API key through the built-in API, but a personal key is strongly recommended. The built-in API may no longer be supported after June 1, 2026.
To get a free personal key:
- Go to mineru.net and create an account.
- Generate an API key in your account settings.
- Paste the key into Zotero → Preferences → llm-for-zotero → MinerU.
- Click Test Connection to verify.
When a personal API key is provided, the plugin calls the MinerU API directly at https://mineru.net/api/v4.
Using a Local MinerU Server
Local MinerU server support was contributed by @renyong18 in PR #152.
Local mode sends PDFs to a self-hosted mineru-api server through POST /file_parse and stores the returned ZIP output in the same local cache format as cloud parsing. The default base URL is http://127.0.0.1:8000.
Prerequisites for local mode:
- Install MinerU and run
mineru-api; see the MinerU docs for installation. - Make sure required models are downloaded.
mineru-apilazy-loads on first request, so the first parse after starting the server or switching backend can take noticeably longer than steady state.
You can pick a Backend in the local section:
pipeline(default) — general-purpose, multi-language, CPU-friendly.vlm— VLM-based, high accuracy on Chinese/English documents, requires GPU.hybrid— newer high-accuracy hybrid pipeline, multi-language, requires local compute.
Test Connection checks that the server process responds at /health; it does not guarantee that all models are warmed up.
With the default 127.0.0.1 address, PDFs stay on your machine. If you change the base URL to a LAN or remote server, PDFs are sent to that server.
Pause / cancel limitation: mineru-api exposes no cancel or DELETE endpoint, only POST /file_parse, POST /tasks, GET /tasks/{id}, GET /tasks/{id}/result, and GET /health. When you click Pause, the plugin stops the queue and aborts the HTTP wait, but the parse already running on the server keeps executing until it finishes, so GPU/CPU work will not stop immediately. Restart the mineru-api process yourself if you need to abort immediately, such as when switching backend without waiting.
Managing MinerU Caches
The MinerU preferences tab includes a Manage Files panel for maintaining parsed PDF caches:
- Browse cached and uncached PDFs by collection, tag, title, author, year, and added date.
- Start parsing all visible files, only filtered files, or selected files.
- Repair local MinerU caches and synced packages when metadata or files drift.
- Delete all, filtered, selected, or single-item caches from the manager.
- Use tag filters, including automatic Zotero tags, to choose which papers are included in bulk actions.
Automatic cache management is event-driven. The plugin watches Zotero item additions, finds PDF attachments on regular items or standalone PDFs, and waits briefly before processing so Zotero can finish importing the file. If the Zotero item exists but the PDF file path or parent attachment list is not ready yet, the queue retries after short delays instead of failing immediately. Deleted attachments are removed from the queue, and already cached PDFs are skipped.
The queue respects the same filters as bulk parsing. It skips PDFs that already have a local MinerU cache or an available synced package, avoids duplicate queue entries, and shows live status through the MinerU dots: ready, processing, or failed. A normal metadata edit does not repeatedly reparse a finished PDF; modify events are mainly used to recover in-progress, failed, or file-readiness cases.
When a parse succeeds, the plugin writes a cache under Zotero’s data directory in llm-for-zotero-mineru/<attachmentId>/. The canonical files include full.md, manifest.json, content_list.json, extracted assets such as images, and _llm_source.json provenance. The manifest is built for AI access: it maps section titles to character ranges, page hints, and section-level figures so the agent can read the relevant slice of full.md instead of loading the whole paper for every question.
After writing a MinerU cache, the plugin clears stale in-memory text and embedding caches for that PDF. The next question can then use MinerU-quality chunks and regenerate retrieval data from the better parsed text.
Advanced parsing filters can skip files before automatic or bulk parsing:
- Skip files over N pages controls the maximum page count used by Start All, Start Filtered, Start Selected, and auto-parse. The default is 100 pages.
- Exclude PDFs by Filename accepts comma-separated substrings, or regex patterns wrapped in
/slashes/, for translated copies, supplements, or other files you do not want parsed automatically.
If Sync MinerU cache with Zotero file sync is enabled, the plugin can create companion ZIP attachments containing full.md, manifest.json, content_list.json, and extracted assets. Sync is optional and default-off. Existing local caches sync only when you request it from the MinerU tab, and synced packages can restore a missing local cache when needed. The repair path validates package metadata and content hashes, prunes duplicate packages for the same source PDF, removes orphaned local caches, and restores usable local cache folders from synced ZIP packages.
Precise Figure Extraction
When Agent Mode answers a question about a figure — or saves a note that discusses one — it pulls a precise, high-resolution crop straight from the source PDF, using the MinerU cache only as an index. Ask something like “What does Figure 3 show?” and the agent locates the figure from the MinerU parse, cuts a clean crop from the original PDF page, and reads that exact image, caption and panels included.
This is different from Figure Interpretation, where you take the screenshot yourself. Here the agent finds and crops the figure for you, and those same crops are what get embedded when you save a figure to your notes.
| Step | What happens |
|---|---|
| Index with MinerU | The MinerU parse supplies figure labels, captions, and page hints. |
| Crop from the PDF | The figure image is cut directly from the original PDF page, not from MinerU’s own images, so labels and panels stay sharp. |
| Cache and reuse | Each crop is fingerprinted against the PDF and reused by later questions and notes; the cache repairs itself when the source changes. |
| Embed in notes | Saving a figure note embeds the crop as  and auto-imports it as a Zotero attachment. |
Good to know:
- No setup. Crops are produced by a small extraction runtime that the plugin downloads and manages per platform, so you never install Python or any other tool yourself.
- Figures, not tables. Tables are read as structured Markdown text from the MinerU parse, so figure extraction skips them by design.
- Requires a MinerU cache. Figure extraction needs the paper to be parsed by MinerU first. Without a cache, the agent falls back to captions and surrounding text and tells you it could not extract the figure image.
analyze-figures skill, which requires Agent Mode. Open the Skills portal to tune how figures are located, interpreted, and embedded.Privacy and Data Flow
- In standard provider mode, paper content and user messages are sent to the model provider you configure.
- In local-model mode, requests go to the local OpenAI-compatible endpoint you configure.
- In WebChat mode, requests are relayed through the browser extension to
chatgpt.comorchat.deepseek.com. - In cloud MinerU mode, PDFs selected for automatic or manual MinerU parsing are sent to MinerU.
- In local MinerU mode, PDFs selected for automatic or manual MinerU parsing are sent to the local or remote
mineru-apiserver you configure. - Conversation history and cached paper context are stored locally by the plugin.
- Agent Mode write operations are routed through reviewable actions and session undo where supported.
Troubleshooting
| Symptom | What to check |
|---|---|
| Test Connection fails | Confirm the base URL, API key, model name, and provider protocol. |
| The assistant cannot see a paper | Reopen the PDF tab, then send a new message so the plugin can rebuild context. |
| WebChat shows a red dot | Keep a ChatGPT or DeepSeek tab open and confirm the Sync for Zotero extension is loaded. |
| Codex App Server fails | Run codex login, confirm codex is on PATH, then click Test connection again. |
| Claude Code mode hangs | Restart the bridge and check curl -fsS http://127.0.0.1:19787/healthz. |
| MinerU parsing fails | Add a personal MinerU API key for cloud mode, or confirm your local mineru-api server responds at /health, then retry Test Connection. |
For bugs or unclear failures, please open an issue.
Roadmap
- Agent mode (beta)
- MinerU PDF parsing
- GitHub Copilot auth
- WebChat mode (ChatGPT web sync)
- Standalone window mode (#78)
- File-based notes (Obsidian, Logseq, any Markdown directory)
- Claude Code integration
- Codex App Server integration
- Customized skills
- Local MinerU support
- Cross-device synchronization (MinerU cache)
- Agent memory system
Frequently Asked Questions
Is it free to use?
Yes, the plugin is completely free and open source (AGPL v3). You only pay for API calls to your chosen provider. With Codex App Server, ChatGPT Plus subscribers can use their existing subscription without a separate API key.
Does it work with local models?
Yes. As long as the local model provides an OpenAI-compatible HTTP API, you can connect it by entering the appropriate API Base URL and key in settings.
Is my data used to train models?
The plugin does not train models. Data handling depends on the backend you choose: your configured API provider, local model, WebChat, Codex, Claude Code, or MinerU.
How do I report a bug or request a feature?
Please open an issue on GitHub.
Contributing & Support
Contributions are welcome! Whether it’s bug reports, feature requests, or pull requests — feel free to open an issue or submit a PR on GitHub.
If you find this plugin helpful, consider:
- Leaving a star on GitHub
- Buying me a coffee
- Donating via Alipay QR code below: